Jump to content

IPBoard Styles©Fisana

Photo

OC's Photoshopping


  • Please log in to reply
37 replies to this topic

#1 Overconfidence

Overconfidence

    Peoplewatcher

  • Members
  • 3,523 posts

Posted 15 April 2005 - 06:32 PM

Posted Image


Oooh, look, OC put some effort into a banner (He hasn't in any other banner). Contrary to popular belief, animated banners aren't very easy to make. Even a simple one like that.

>>
<<

Oh, by teh way, the reason i'm posting this is 'cuz i'm very bored.

Meh, if I make any more banners, i'll post 'em in here.

#2 Overconfidence

Overconfidence

    Peoplewatcher

  • Members
  • 3,523 posts

Posted 15 April 2005 - 08:07 PM

Ooh, ooh, a desktop I made for myself that I may or may not actually use XD. Well, maybe on one monitor.

Comments are welcome.

Posted Image

#3 Zythe

Zythe

    Beginner

  • Banned
  • 1 posts

Posted 16 April 2005 - 11:57 AM

Nice work, remember you can edit posts though. I still haven't figured out ImageReady, so you have my deepest respect.

#4 Toan

Toan

    feeesh

  • Admin
  • 7,858 posts
  • Location:in teh tank.
  • Gender:Male
  • Mars

Posted 16 April 2005 - 12:17 PM

Mmm...I adore the font of the wallpaper, OC. And the pulsating lightening effect = purdy.

I don't go much for animated banners...having been punished by 56K in the past, I don't want to punish those who were as unfortunate as I used to be. XD

#5 Armeggadon

Armeggadon

    The Dead-ly Bunny

  • Members
  • 1,616 posts
  • Gender:Male

Posted 16 April 2005 - 01:33 PM

really oc? that wallpaper looks liek all you'de have to do is have the 2 graphics then tween them with only opacity... i've never found animated banners hard to make but meh. its looks very nice

#6 Overconfidence

Overconfidence

    Peoplewatcher

  • Members
  • 3,523 posts

Posted 16 April 2005 - 02:07 PM

Yes, opacity is one thing. Then I had to change the amount of the effect I did to the first thing, and contrast and color, etc...

Heh, and the wallpaper I made a reflection/watery looking thing for my left monitor, it looks cool now (reg on right side, reflection on left)

#7 Hylian Diety

Hylian Diety

    Journeyman

  • Members
  • 310 posts

Posted 16 April 2005 - 10:00 PM

Both are very cool in my opinion. I'm not big on technical stuff, so I don't care what you did or how you did it. I just appreciate what it is you really have, and the outcome on both of your things there are very nice. Both of them depict EXACTLY what you want, I'm sure. Very, very good.

#8 Overconfidence

Overconfidence

    Peoplewatcher

  • Members
  • 3,523 posts

Posted 17 April 2005 - 02:52 PM

Why thank you ^_^;.

#9 Sephrenia Katrov

Sephrenia Katrov

    Muted Muse

  • Members
  • 2,126 posts
  • Location:Birmingham ;_;
  • Gender:Female
  • South Korea

Posted 17 April 2005 - 02:55 PM

oO As much as the red is captivating, you've managed to make the non-reddy mesmerize me more. How unfair.

#10 Zythe

Zythe

    Beginner

  • Banned
  • 1 posts

Posted 17 April 2005 - 03:02 PM

How did you do the lightning?

#11 Overconfidence

Overconfidence

    Peoplewatcher

  • Members
  • 3,523 posts

Posted 17 April 2005 - 03:17 PM

Well...

Ehh, it's kinda complicating... Basically, render some clouds, invert it a few times or something, then mess around with the brightness/contrast/levels/saturation until you get it to the kinda lightning random effect (all done in black and white). That's the effect that the one frame is in. Then, you give it glowing edges, or plastic wrap (one of these, I forget), and then press crtl-u and colorize it (lots of saturation is good). The orange lightning is after you have glowing edges and colorized, the white lightning is just the clouds and levels.

#12 Zythe

Zythe

    Beginner

  • Banned
  • 1 posts

Posted 17 April 2005 - 03:42 PM

Well, I can't do it, but my attempt made something else altogether... which I'll post later.

#13 Overconfidence

Overconfidence

    Peoplewatcher

  • Members
  • 3,523 posts

Posted 17 April 2005 - 03:45 PM

Alright. I'll do some more detail on the description Oo;;

New document.

set your colors to default, then invert them.

render clouds

render difference clouds

invert

levels (Put the grey halftone slider to the right)

Glowing edges (low width and smoothness)

colorize (whatever hue, but high saturation)

Yeeaaahhh.

#14 Overconfidence

Overconfidence

    Peoplewatcher

  • Members
  • 3,523 posts

Posted 21 April 2005 - 10:01 PM

Ooh, ooh, here's another one that I made, messing around with a few patterns I made and a basic picture.

Posted Image

#15 Overconfidence

Overconfidence

    Peoplewatcher

  • Members
  • 3,523 posts

Posted 05 May 2005 - 10:19 PM

Oh, and here's a new desktop I made.

Posted Image

#16 Chikara Nadir

Chikara Nadir

    Crisis from the Skies

  • Admin
  • 13,566 posts
  • Location:Hobbiton
  • Gender:Female
  • Antarctica

Posted 05 May 2005 - 11:26 PM

That's so..prettiful. @_@ It's gorgeous! Oh, and 'cool', if you want a more masculine compliment. ;)

#17 Vazor

Vazor

    Pancake Pirate

  • Members
  • 3,366 posts

Posted 06 May 2005 - 04:06 PM

That wallpaper may be one of the greatest I've ever seen. So...cool...

#18 Overconfidence

Overconfidence

    Peoplewatcher

  • Members
  • 3,523 posts

Posted 06 May 2005 - 05:32 PM

XD Whoa, thanks a lot ^_^! Yeah, it started out as some bland mountain scene that I found.. *blinks* Maybe I should write a tutorial on how to do the glass effect.

#19 Overconfidence

Overconfidence

    Peoplewatcher

  • Members
  • 3,523 posts

Posted 06 May 2005 - 07:53 PM

Okay, here are two detailed tutorials.

1. Lightning (I picked this one up after a different tutorial, and playing around a bit)

Create new document (500px x 500px x72dpi works just fine)

Set colours to default (Black and white)

Filter > Render > Clouds

Filter > Render > Difference Clouds

Invert (Ctrl-I)

Levels (Ctrl-L) > Move the grey midtones slider to the furthest right

Filter > Stylize > Glowing Edges with low edge width, medium brightness, and low smoothness (Ex. 2/6/3)

Colorize (Hue/Saturation) (Crtl-U) Check the "Colorize" box, put the saturation to the max (255), and the hue to whatever colour you want.

Annnnd you're done!

2. Glass

Create a new document, with a 3x3 pixel dimension.

Fill it with black, with one white pixel in the middle.

Then go Edit > Define Pattern and save the pattern.

Open up a picture (whatever one you want), And make a new layer.

Edit > Fill > Use "Pattern"

Now select the pattern than you just made (the 3x3 pixel one) And click "Ok"

Now here's where you can get creative.

You can either go Filter > Distort > Glass/Ocean ripple on whatever settings you want, or use some other distortion filter. I'll cover the 'block' setting of Glass later, though.

After you've distorted the pattern, apply a gaussian blur of between 1-3 pixels (Filter > Blur > Gaussian Blur)

>>> If you want to make it look somewhat like window panes, instead do Filter > distort > glass, change the texture to blocks, distortion to 5 and smoothness to 4, and adjust the scaling to something higher if your picture is big (I'm working on a 1024x768 document). It'll look very messy, so apply the blur (1-3 pixels, again, whatever works, i'm using 1.5). Now go Filter > Stylize > Glowing edges, 2 width, 7 brightness, 2 smoothness. <<<

Whichever distortion you used, now set your blend type to screen (In layer options).

Now you can have some fun. Grab the magnetic lassoo tool (hiding underneath the regular lassoo tool) and, while selecting your distorted glass layer, make an odd shaped selection (however you want it). Hit delete (clear the selection that you made), and then go Select > modify > border. Make the width something appropriate (guess and check, basically, bigger selections need bigger width). On mine I used 70 pixels, but 20 is good for smaller pictures.

Filter > Stylize glowing edges, keep the settings that are there, but put the brightness up to around 15-20 (Adjust the smoothness to around 5 if your edges are too sharp).

Now you're pretty much done, from here you can play around with it, add different textures overtop, set them to screen, and then select the "broken" part of the glass (in the middle, and delete it from the texture. Adding more layers of glass can also be neat.

Here's my result after messing around for a few minutes:

Posted Image

I could make a tutorial on how to work that on real windows, if anyone's interested.

EDIT: Here it is, worked on a real window.

Posted Image

#20 Toan

Toan

    feeesh

  • Admin
  • 7,858 posts
  • Location:in teh tank.
  • Gender:Male
  • Mars

Posted 06 May 2005 - 08:33 PM

B-E-A -utiful job with that window too, OC!

I like how you managed to put the window behind the bottle of lotion and still maintain a realistic effect going on - again, beautiful. :)

#21 Zythe

Zythe

    Beginner

  • Banned
  • 1 posts

Posted 07 May 2005 - 10:16 AM

Wow. Keep the turorials coming!

#22 Overconfidence

Overconfidence

    Peoplewatcher

  • Members
  • 3,523 posts

Posted 07 May 2005 - 12:33 PM

Alright, here's quite a simple tutorial on how to make a picture look dreamy (From a regular scene to the dreamy-ish mountain one that I used)

(Sorry the pics are so big)
We'll change this one:
Posted Image


To this:

Posted Image

Take your image, copy it, and paste it as another layer.

Apply a gaussian blur (filter > blur > gaussian blur) of about 5 pixels (depends on which image you use), and change the blend mode to screen.

Paste the origional picture again, and apply a motion blur of about 30-50 pixels at an angle of 45 degrees (again, adjust the distance of the blur to the size of your picture). Set the blend mode to screen, and the opacity to 30%. Paste your origional picture again, and use all of the same settings, except for have an angle of -45 degrees.

Paste the origional picture AGAIN, and use filter > artistic > underpainting with default settings. Redo this step on the same layer 1-2 times. Change the blend mode to screen, and the opacity to 60%.

Create another layer with your origional picture, make sure your colors are set to default (black and white) and filter > sketch > charcoal with settings 1/5/50. Set that layer to screen, with an opacity of 20% (You don't want it too noticable).

You're pretty much done now, if you want you can create a new layer (blank), fill it with black and change it to screen, then brush over some of the colored areas with a similar color brush to create some contrast between the darks and the lights.

And you're done. Not too amazing, but a nice effect.

#23 Overconfidence

Overconfidence

    Peoplewatcher

  • Members
  • 3,523 posts

Posted 08 May 2005 - 03:08 PM

Alright, my next tutorial will be on how to make that glass effect go with real windows. I was playing counterstrike source earlier, and look a screenshot of a window.

Posted Image

As you can see, the window is reflecting quite a bit of the light. I'll use the settings that I used on this window, and you can adjust the distances/amounts to whichever picture that you're using (as the proportions may be different)

The picture ended up looking like this:

Posted Image

To start off, I blurred the edge of the frame a bit (not necessary, but I didn't have anti-aliasing turned on in-game, so the edges were jagged).

First off, I selected the window portion. With a squarish window such as this one, you can use the polygonal lassoo tool (hidden under the regular lassoo tool), although the magnetic lassoo tool will work on more irregular shaped windows (Or if there is an object in the way, such as the lotion bottle in the earlier picture).

After doing the selection, create a new layer and fill it with your pattern (mentioned in the earlier glass tutorial), apply a distortion, then a small gaussian blur. This whole section was covered earlier.

Change the layer type to screen, then create a new layer. Keep the origional selection of the window, and fill this layer with the pattern, as well. Now apply filter > artistic > sponge to this layer with brush size 0, definition 25, and smoothness 1. Now apply filter > stylize > glowing edges, with width 1, brightness 20, and smoothness 10-15 (whatever you want).

With that layer still selected, take your magnetic lassoo tool and make a hole in the middle. Clear the selection, and clear the below layer as well. Go back to your 'cracks' layer and set it to screen. Now comes the fun part. Take a hard round 19 pixel or less brush and start getting rid of the cracks layer, except for the lines that come from the window. After you've done the erasing, select the missing glass (middle) with the magic wand, and, while selecting your first glass layer, go select > modify > border by 15-25 pixels.

Now apply filter > stylize > glowing edges 2/20/2 for settings.

Returning to your 'cracks' layer, you can add some more cracks with a white 1 pixel brush, imitating what's already there. Then take a small 12 pixel spatter brush and, on the same layer, brush over at about 30% opacity the extra cracks that you made.

To get rid of the frosted effect of the origional layer (first glass layer), grab a 100 pixel eraser (or whatever the biggest brush you can use while retaining some control) and erase all of the window (on your glass layer), except for the edge of the break (Basically, erase all but around where your border selection was).

Now we're getting there! The last step is to remove the whole glare/reflection effect of the broken glass. If your background is a single color (Such as a blue sky), then select the missing glass (magnetic lassoo, or magic wand, while on your 'glass' layer), then click on your origional picture layer. Select a couple of the sky or whatnot's color, and brush over the selection until all trace of the reflection is gone from the missing glass.

If it's a more complicated background such as the one in my picture, select the missing glass using the methods above, and then go image > adjust > brightness/contrast and up the brightness/contrast by 15 or so (in mine, I upped the contrast by 30, experiment and see what makes it look more realistic).

And there you have it. The step of removing the glare can be ignored if there isn't much noticable glare in the first place.

#24 Overconfidence

Overconfidence

    Peoplewatcher

  • Members
  • 3,523 posts

Posted 11 June 2005 - 02:09 PM

Posted Image

A new banner. Ooh, whaddya think? (even though the image was stolen, but edited quite a bit)

Posted Image

#25 Zythe

Zythe

    Beginner

  • Banned
  • 1 posts

Posted 11 June 2005 - 02:52 PM

Amazing talent and awesomeness.

#26 Overconfidence

Overconfidence

    Peoplewatcher

  • Members
  • 3,523 posts

Posted 11 June 2005 - 03:18 PM

Haha, thanks.. but the guy to thank is the one here who made the amazing picture: http://cr0m.homestea...s/eye150dpi.jpg

.. Although I am quite proud of my current banner ^_^.

I also fixed up the shattered glass tutorial.

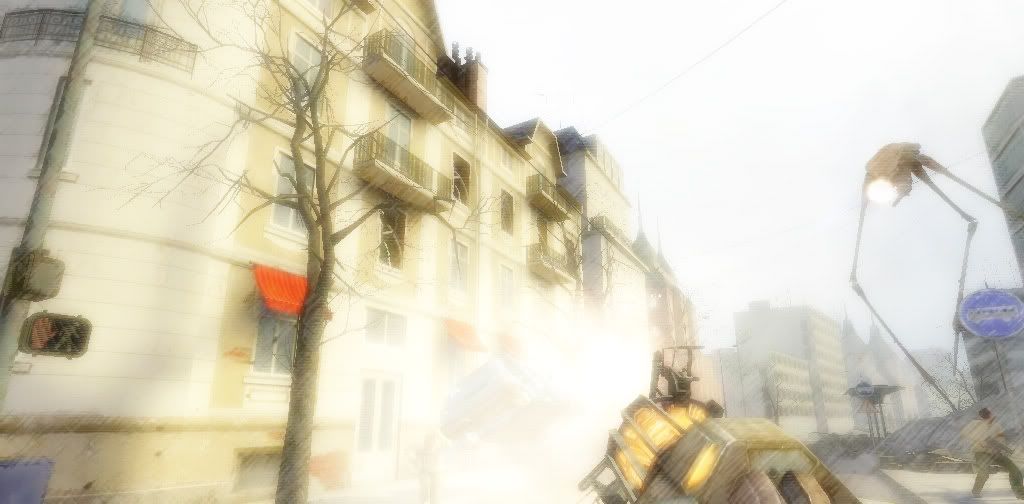
.. And as a side note, check out the awesome HL2 renders over here http://forums.facepu...ead.php?t=21286 If you haven't... Nothing to do with me, but awesome nonetheless.

#27 Zythe

Zythe

    Beginner

  • Banned
  • 1 posts

Posted 11 June 2005 - 03:28 PM

Nice work, Daiken <_<

#28 Overconfidence

Overconfidence

    Peoplewatcher

  • Members
  • 3,523 posts

Posted 11 June 2005 - 03:59 PM

Haha, yeah, I have no clue who it is, but i've been directed there quite a bit.. I wish I could 3D render like that.. or at all, really :P.

#29 Zythe

Zythe

    Beginner

  • Banned
  • 1 posts

Posted 11 June 2005 - 04:12 PM

I have this amazing 3d program a friend gave me... I don't have a clue how to use it and the tutorials are all in foreign so I give up. It just sits there in my harddrive.

#30 Overconfidence

Overconfidence

    Peoplewatcher

  • Members
  • 3,523 posts

Posted 11 June 2005 - 07:09 PM

Posted Image

Sorry it's a bit big... just something I made a little while ago, playing around with some blood spatter brushes.

Posted Image

Another image a made a little while ago, playing around with some effects. I do realize that the angle is way off, =P.


Copyright © 2025 Zelda Legends